6 The Assessment of Sulphur Dioxide
6.1 PRINCIPLES OF THE METHOD
As explained in Section 2, the concentration of sulphur dioxide in the air is estimated by drawing a metered volume of air through dilute, acidified hydrogen peroxide initially at pH 4.5 in a bubbler. The solution is acidified to pH 4.5 so that strong acids (primarily SO2) are absorbed in preference to weakly acidic compounds such as carbon dioxide. Sulphur dioxide in the air reacts with the peroxide to form sulphuric acid in solution, increasing its acidity (decreasing the pH). The total amount of acid in the exposed solution is determined by titration with a standard alkaline solution of di-sodium tetraborate, back to pH 4.5. This ‘titre’ is then used in the calculation of the ambient concentration of SO2.
The procedure uses three solutions:
- dilute hydrogen peroxide, acidified to pH 4.5 by addition of dilute sulphuric acid
- dilute (0.002 M) sulphuric acid; this is used to adjust the pH of the peroxide solution to pH 4.5 before use
- dilute (0.002 M) di-sodium tetraborate; this is used to titrate the exposed samples back to pH 4.5.
Successful titration depends on the accurate preparation of acid and alkaline solutions and the delivery of these in accurate amounts by means of burettes. This section describes how these solutions should be prepared, tested, and used.
Chemical indicator is used to determine the end-point of the titration; specifically, BDH pH 4.5 indicator (manufactured by BDH Merck) is used. At pH 4.5, this indicator is grey, with neither a pinkish or bluish tinge. This is termed ‘neutral grey’. The indicator has a pinkish colour in more acidic solutions, and a bluish colour in more alkaline solutions. BDH pH 4.5 indicator should always be used; operators should only use a pH meter instead if they are colour-blind.
6.2 STRENGTH OF SOLUTIONS
6.2.1 Sulphuric acid and di-Sodium Tetraborate
The current convention for describing strength of a solution is in terms of moles per cubic decimetre (a cubic decimetre, dm3 , is more commonly termed a litre). However, the terms ‘Molar’ and ‘Normal’ are also still in use.
A ‘Molar’ (or 1M) solution was an alternative term for one which contains 1 molecular weight (in grammes) of solute in a litre of solution (1 mole per dm3, or mol dm-3 ). The molecular weight of a substance is a constant. The abbreviation ‘M’ is still used, however the term molar is obsolete.
‘Normal’ is an older term, also obsolete. It refers to a solution of one gram-equivalent weight of the reacting substance in one litre of solution. One litre of a ‘Normal’ (1N) solution of any alkali contains the amount of that alkali required to neutralize one litre of 1N acid. Thus, one litre of N/250 or 0.004N sulphuric acid will neutralise one litre of N/250 alkali or alternatively, 1000/250 ml of 1N alkali. A Normal solution of sulphuric acid contains 49 grammes of sulphuric acid in one litre of solution.
The solutions used here are 0.002 mol dm-3 (0.002 M, N/250) di-sodium tetraborate (Na2BO7 (aq)) in deionised water, and 0.002 mol dm-3 (0.002 M, N/250) sulphuric acid (H2SO4 (aq) )in deionised water.
6.2.2 Hydrogen Peroxide
Hydrogen peroxide (H2O2) is unstable, and decomposes to water and oxygen (slowly in dark, cool conditions but rapidly in ultra-violet light). This process is not reversible however high the pressure of oxygen. Hence, even in a closed container, the strength of a hydrogen peroxide solution is never exactly known. Therefore, the concentration or dilution of hydrogen peroxide can only be approximate. The strength of a solution of hydrogen peroxide (H2O2) is expressed as ‘volume’ strength; for example a 100 volume concentrated solution is capable of releasing, on decomposition, 100 times its own volume of oxygen.
The peroxide solution used in these procedures is very dilute; 1 volume strength. However, the precise strength of the peroxide solution is not critical to the measurement process.
6.3 USE AND CARE OF LABORATORY GLASSWARE
The term "glassware" here is used to refer to all laboratory ware, whether glass or plastic. Glassware used for acid, peroxide and borate should be kept separate; eg. separate burettes, and beakers used to fill them. Separate volumetric flasks etc. should be used to make up the solutions. It may be helpful to adopt a colour coding system, marking the top of burettes, beakers, and volumetric flasks with a small strip of coloured tape, eg. red for acid, blue for borate, black for peroxide. Any such marking should not obscure graduations on the glassware, or be used on titration flasks where it could affect perception of the end-point. All storage bottles should be clearly labelled with the contents and date of preparation. Fig. 6.1 shows some of the apparatus used.
6.3.1 Cleaning and Rinsing
All laboratory glassware should be clean before use, washed with detergent if necessary, followed by several rinses with tap water, and two rinses with deionised water. Invert the glassware to drain. Storage containers used for prepared solutions should be rinsed at least twice with small amounts of the solution before the main bulk of the solution is transferred. Likewise burettes and flasks should be rinsed twice before use with small amounts of the solution to be placed in them. It is not necessary to fill the whole container when rinsing; a small amount is sufficient as long as all surfaces are rinsed. Volumetric flasks should be stoppered and inverted several times, burettes can be tilted back and forth .
6.3.2 Filling Volumetric Containers
When using burettes and volumetric flasks, it is often necessary to fill with liquid to a mark on the container. The mark should be at eye level, where it will appear as a single horizontal line. Stand the container on a firm level surface (or for a burette, ensure it is vertical in its stand) and bring the eye into line with the liquid by sitting or bending down (this is much more accurate than lifting the container up to eye level, and also keeps both hands free). Fill almost to the mark, but stop a little short of the final amount and wait for liquid on the walls to run down. The last few drops are best added from a small beaker than from a bottle. If the liquid being added is deionised water, a wash bottle can be used.
The bottom of the meniscus (the concave surface of the liquid within the burette or the neck of a flask) is always used as the point of reference. When the container is filled exactly to the mark, the bottom of the meniscus will rest exactly on the line when viewed at eye level. Some types of plastic laboratory ware give a flat meniscus; in this case the horizontal line of the meniscus is the point of reference, but it is still important that the mark is at eye level.
6.3.3 Use and Care of the Burettes
Two separate burettes are needed for acid and di-sodium tetraborate. They should be labelled clearly, and always kept in the same positions in the burette stand to avoid confusion. The tap of a burette occasionally requires lubricating; a very small amount of tap lubricant should be used - too much will eventually cause a blockage. Blockages in the tap or the tip of the burette can be cleared using a fine wire. Do not use a needle as this may damage the glass.
Before filling, rinse the burette with a small amount of the solution to be used. Only a small volume is needed for this; tilt the burette to ensure all surfaces are rinsed. Discard the rinsings.
Fill the rinsed burette to just above the zero mark, using a small beaker (one each is needed for each reagent, clearly labelled). With the beaker under the tip, open the tap fully for a few seconds to remove any bubbles from the tip. Allow the solution to settle. Make sure the burette is vertical in its stand, and adjust the level to the zero mark.
If funnels are needed in addition to the beakers, they should be kept separate for each reagent. Do not leave funnels standing in burettes ‘permanently’ as (i) they may drip into the burette during titration, affecting the measurement and (ii) they may collect dust which will be washed into the burette.
6.3.4 Reading the Burette
The burette must be vertical in its stand. The reading is taken with the liquid meniscus at eye level.
Reading the level of the bottom of the meniscus is easier if a piece of white paper is threaded over the burette by two horizontal slits, the central area lying behind the tube and carrying a black band (eg. a strip of black plastic tape) which is placed a little below the meniscus. The black is reflected in the lower surface of the meniscus, and is contrasted with the white paper directly behind.
The paper strip is not necessary with "Schellbach"type burettes. These have a vertical blue band on the rear side. When the liquid surface is viewed at eye level, this band appears as an upward-pointing arrow, with the bottom of the meniscus at its point.
When reading the level, the scale on the burette should be read to the nearest 0.01 ml (two decimal places) as follows:
- Note whole number from that printed at the side of the scale (long marks).
- Note first decimal from short scale marks(one interval equals 0.10ml).
- Note second decimal by estimating in tenths of one interval the distance between the last mark and the bottom of the meniscus (see examples in Fig 6.3).
- If the titration is for preparation or testing of solutions (as in Section 6.5 and 6.6)
, calculate the measured volume without correction.
- If titrating an exposed peroxide solution with borate (as in Section 6.4)
, correct the measured volume to one decimal place before entering on the Data Return Form. When the second decimal place is "5", correct to an even digit, (eg. 0.45 to 0.4, 0.55 to 0.6).
The burette may need re-filling during a titration. If so, stop before the end of the scale is reached, record the reading, and work out how much liquid has already been added. Remove the titration container from under the burette so no drips fall into it. Fill the burette and allow to settle. Read and record the new level, complete the titration and calculate the additional volume added to the sample. The sum of the two volumes is the complete titration, and should be rounded to the nearest 0.1 ml as above and recorded.
6.4 TITRATION OF EXPOSED SAMPLES
Each time the sampler is visited, seven days’ peroxide samples will be obtained. These should be kept sealed, labelled with the site and date of exposure, and preferably in a refrigerator until they can be titrated.
When titrating the solutions, lighting and surroundings can affect your perception of the titration end point. Ensure adequate lighting, ideally daylight, and north light if possible. Avoid bright direct sunlight. Artificial lighting should be of the "daylight" type. The colour of surroundings, such as walls, ceilings, furniture, and even clothes, can affect colour perception. The work surface should be white, or covered with white paper or bench protector, as should the walls facing the work area and behind the burette. Replace the white paper as soon as it starts to get yellow or dirty. Wear a white lab coat or overall.
Always use a sample of unexposed peroxide, from the same batch as the exposed samples, as a reference to help identify the neutral grey end point. This is termed a ‘colour control’.
Ensure all glassware is clean. Use conical flasks for titration, rather than the bubbler bottles. The flasks should be kept for this purpose only, and rinsed well before each use with a little of the fresh pH 4.5 1 volume hydrogen peroxide solution.
The procedure for titration of exposed samples is as follows:
- Fill a clean, dry burette with 0.002 mol dm-3 di-sodium tetraborate, using a small beaker kept for this purpose only. Clear any bubbles from the burette tip.
- Allow to settle, set the bottom of the meniscus to zero (or any convenient level; there is no need to fill the burette to the top), and wipe outside of tip dry using a clean paper tissue.
- Take two clean 150 ml conical flasks, identical in shape, size, and glass colour. Rinse twice with some pH 4.5 1 volume hydrogen peroxide solution.
- Take the first of the exposed peroxide samples, record the site name and date of exposure, empty into one of the flasks and label as the sample.
- Into the other flask, pour some unexposed pH 4.5 1 volume hydrogen peroxide solution; the same volume as the solution in the sample flask. Label as ‘colour control’ ; this unexposed peroxide will be used as a reference to help identify the titration end point.
- To the colour control add 1 to 4 drops of BDH 4.5 indicator. Colour should be very pale "neutral grey"; if not, steps must be taken to check pH and indicator.
- Add the same amount of indicator to exposed sample(s), if control is correct. If colour of exposed sample is blue, write "ALK" on record form; if neutral grey write "0.0", but if pink, or pinkish-grey, titrate as follows:-
(i) Read the burette to nearest 0.01 ml (take reading from bottom of meniscus).
(ii) Add borate solution carefully to sample until colour exactly matches that of neutral grey control. Add last drops slowly and swirl flask to mix before comparing.
(iii) Read burette again to nearest 0.01 ml and deduct first reading; record the volume of solution added, to the nearest 0.01 ml. Now correct this value to the nearest 0.1 ml, before entering on network data return form against the date of exposure.
(The aim is to titrate to exactly neutral grey. However, if the end-point is accidentally overshot and a blue colour appears, correction can be made as follows. Record the burette reading, and add 0.002 M sulphuric acid to bring the solution back to neutral grey. Subtract the volume of acid added from the volume of borate added, to give the corrected borate titre. Please note that this should be avoided, as it increases error.)
- Proceed with the next sample. The flask in which the exposed samples are titrated need not be rinsed and dried between samples, just drained thoroughly.
The same colour control can be used for all seven day’s samples, but work quickly; the indicator will start to deteriorate after around 20 minutes (tending to become more blue).
Do not leave solutions standing in an open burette from one week to the next, as evaporation will cause the solution to become stronger. When you have finished titrating, either :
- seal the top of the burette with a plastic bung (a rubber bung may be used for the di-sodium tetraborate burette but not for the one containing sulphuric acid). Before each measurement session, remove the stopper, and run out around 1 ml of the solution, to clear the burette tip of any solution which may have become more concentrated by evaporation (If your burette is filled via a tube from a sealed squeeze bottle, do the same).
Or -
- alternatively, empty the burette after use, rinse through with deionised water, and leave to dry with the tap open.
The beakers used to fill the burettes should be rinsed with deionised water and drained. This also applies to funnels, if used. Un-used solution left in the filling beaker or the burette should be discarded, not returned to the storage bottle. With experience, operators will get to know how much solution is usually needed, and waste will be minimised.
6.5 PREPARATION OF SOLUTIONS
All solutions must be made up with deionised water. Ordinary tap water is not suitable, nor is distilled water obtained from garages, as this may be contaminated.
6.5.1 di-Sodium tetraborate Solution 0.002 mol dm-3 (0.002 M, N/250 )
The most convenient method of making up this solution is to use commercially available ‘ConvoL’ or similar ampoules, which contain a concentrated solution for dilution. The instructions are as follows:
- Take a clean 500ml volumetric flask, and one ampoule.
- Following the instructions on the pack, empty the contents of the ampoule into the flask.
- It is important to ensure that all the ampoule contents are transferred to the flask. So, using a plastic wash bottle filled with deionised water, rinse out the ampoule and the top of the neck, at least three times. Pour the rinsings into the flask. Note: Take care not to use too much force that water splashes.
- Insert the flask stopper and invert the flask several times to mix well. The flask now contains 500 ml of 0.002 mol dm-3 di-sodium tetraborate solution. Do not use any of this for rinsing. Pour the contents of the flask into a clean and dry 500ml reagent storage bottle. Then label the reagent bottle with contents and preparation date.
- Rinse the graduated flask with deionised water and invert to drain. The stopper should also be washed.
- Now test the strength of the solution, using the procedure in section 6.6
If you have difficulty in obtaining ampoules, AEA Technology Environment make up the solution from the solid (Na2B4O7 .10H2O (s) ), and can supply this free of charge to Network site operators. If you need borate from AEA Technology Environment, please send us -
- a plastic screw-topped bottle, approx. 500 ml volume, cleaned and rinsed thoroughly with deionised water, and labelled with the contents, "0.002 M di-sodium tetraborate in deionised water, Na2B4O7 (aq)". This should be tough and leak-proof.
- a sticky label, giving the address to which the borate should be sent (your office or lab). It need not be reply-paid, but must be suitable for addressing the outside of a package.
Pack these in a sturdy cardboard box (NOT a padded envelope) which will stand the journey to AEA Technology Environment and back. We will rinse and fill the bottle with di-sodium tetraborate solution, re-pack it in the box, affix your label and return it to you. Please phone and let us know you will be sending a bottle. Currently, we do not send out any other solutions by post.
The made-up solution has a shelf-life of upto nine months. It should be kept in a sealed container, to prevent it becoming more concentrated by evaporation. Shake the container before use if it has been standing for a long while.
6.5.2 Sulphuric Acid 0.002 mol dm -3 (0.002 M or N/250 )
This solution is also most conveniently made up from commercially available ‘ConvoL’ (or similar) ampoules, containing concentrated sulphuric acid for dilution. However, these are not supplied for 0.002 mol dm-3 strength, but only for 0.01mol dm -3 (0.02N or N/50) solution. This is five times the required strength, so additional dilution is necessary. The 0.002 mol dm-3 strength solution required is obtained by making up the solution to 500ml, as in the instructions, and then further diluting to obtain 2500 ml of 0.002 mol dm-3 strength solution. The instructions are as follows:
- Follow steps 1 to 3 above, as for borate.
- Insert the stopper and invert the flask several times. The flask now contains 500 ml of 0.01mol dm -3 (N/50) sulphuric acid. Do not use any of this for rinsing. Pour the contents of the graduated flask into a clean and dry 2500ml reagent storage bottle.
- Now carry out the additional dilution. Immediately re-fill the graduated flask with deionised water, accurately to the mark as before, and empty the contents into the reagent bottle. Repeat this action a further three times, with deionised water , bringing the total in the storage bottle to 2500ml.
- Cap the reagent bottle securely and invert several times to mix the solution. Then label the reagent bottle with contents and preparation date. If using labels supplied with the pack of ampoules, remember to alter the label to read "0.002 mol dm-3 ".
- Rinse the graduated flask with deionised water and invert to drain. The stopper should also be washed.
- Now test the strength of the solution, using the procedure in section 6.6.
6.5.3 Preparation of pH 4.5 dilute hydrogen peroxide solution (1 vol)
The dilute, acidified hydrogen peroxide solution used in the bubblers is made up by diluting concentrated hydrogen peroxide to the required strength, and adjusting to pH 4.5 by adding dilute (0.002 mol dm-3) sulphuric acid. Note: this will involve a titration, requiring some of the previous batch of pH 4.5 peroxide to use as a colour control. If this is the first batch, or the ‘old’ solution is unreliable, follow the procedure in Section 6.6 to make a colour control.
Safety precautions are needed when handling concentrated hydrogen peroxide solution, as it is a strong oxidising agent. Always follow the instructions on the bottle: it is advisable to wear gloves, a laboratory coat and safety glasses. If the concentrated peroxide gets on the skin, wash immediately with plenty of water. If the concentrated solution is supplied in an ordinary screw-capped bottle, take care when opening: the build up of oxygen may cause a fine spray of liquid as it is opened. However, most manufacturers now supply concentrated peroxide in bottles designed to prevent this happening. Keep concentrated peroxide in a cool dark place, preferably a refrigerator.
The 1 vol (dilute) solution is prepared by diluting 100 vol strength (concentrated) hydrogen peroxide with deionised water, in a ratio of 1:99. For example, 10 ml may be diluted with 990 ml of deionised water to make 1 litre; 25 ml may be diluted with 2475 ml of deionised water to make 2.5 litres, and so on. Once diluted, the solution must be brought to exactly pH 4.5 by addition of sulphuric acid (this is sometimes referred to as ‘neutralising’ the solution to pH 4.5).
To make up one litre:
- Fill a clean dry burette with 0.002 mol dm-3 sulphuric acid, allow to reach room temperature and set the bottom of the meniscus to the zero mark.
- Using a clean dry 10 ml measuring cylinder, measure 10 ml of concentrated peroxide. To get exactly 10 ml, fill to just over the line, and remove the excess using a clean dropper kept for this purpose only. Discard the excess drops of concentrated peroxide carefully.
- Tip the 10 ml of concentrated peroxide into a clean 1 litre measuring cylinder. Rinse the 10ml cylinder carefully, using a wash bottle of deionised water, pouring the rinsings into the large cylinder.
- Fill the 1 litre cylinder almost to the 1 litre mark with deionised water. Use the wash bottle to top up accurately to exactly 1 litre.
- Pour the contents into the reagent storage bottle to be used (See section on treatment of new storage bottles). Cap securely, and shake well for about 30 seconds to mix.
- Take exactly 50 ml of the above solution, using a 50 ml measuring cylinder, and pour into a clean dry 150 ml conical flask. Add 1 to 4 drops of BDH "4.5" indicator, enough to give a definite but not deep colour. The solution will probably be blue, or blue-grey.
- Take an identical conical flask, and pour in 50 ml of the previous batch of peroxide. This will be the ‘colour control’, for reference. Mark the flask neck ‘cc’. Add 1 to 4 drops of indicator as above; the colour control should be neutral grey.
- Return to the flask of fresh solution. From the burette, add acid (reading the meniscus first) until the sample exactly matches the neutral grey colour control. The amount needed will be small, so add the acid carefully; drop by drop at the end. Read the meniscus again and calculate the volume of acid added, to the nearest 0.01 ml.
- Now calculate the volume of acid needed to neutralise to pH 4.5 the 1 vol hydrogen peroxide remaining in the storage bottle, as follows:
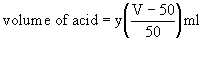
-where y = volume of acid added to the 50 ml sample (ml), and V is the volume of dilute peroxide made up.
eg if 2500 ml of 1 vol hydrogen peroxide is made up (V), and the volume of acid (y) used for the 50 ml sample is 0.30 ml, then the amount required for the storage bottle is 0.30 x (2500-50)/50 ml or( 0.30 x 49) ml, ie 14.70 ml.
- Add the calculated amount of acid from the burette directly into the storage bottle by adding the volume required to the existing meniscus reading and allowing the meniscus to fall to the new figure. The last few drops should be added slowly. Cap the bottle and shake well to mix.
- Measure 50 ml from the storage bottle into a third flask. Add the same amount of indicator as to the earlier sample. The three samples should now be the same colour. If the third sample shows appreciably more blue or more pink colour than the colour control, it must be brought back to neutral grey in exactly the same way as for the first sample; 0.002 M sulphuric acid being used if the colour is blue, 0.002 M di-sodium tetraborate if pink. As before, the amount to be added to the storage bottle must be calculated, using
 instead of
  and run in; a fourth sample is taken to check that the colour is now correct.
- Indicator must never be added to the solution in the storage bottle
, only to a sample in a separate vessel.
- Label the bottle with the contents and date. Provided that the bottle has been "conditioned" so that no alkali is given off from the glass, the solution should remain unchanged for at least two weeks if kept in a cool, dark place. Solution more than two weeks old can be kept for rinsing glassware.
- Every new batch of diluted hydrogen peroxide must be carefully titrated and brought to pH 4.5 in this way; different batches of deionised water will vary in pH and it cannot be assumed, because (say) 14.7 ml of acid were required on one occasion, that the same amount will be needed on the next.
- Occasionally, non-neutralised 1 vol hydrogen peroxide may be pink when the indicator is added (step 5); this may be due to contaminated water. When the solution is acid, the neutralisation is carried out with borate in place of the sulphuric acid. Procedure and calculation are identical in both cases. It is advisable to check the pH of the deionised water if this occurs, and if necessary change the source of supply.
Carry out steps 6 to 11 within about 20 minutes, because once the indicator is added to a solution it will deteriorate, and appear more blue.
6.6 TESTING ACID AND BORATE STRENGTH
Every time a fresh supply of either 0.002 M di-sodium tetraborate or 0.002 M sulphuric acid is prepared, its accuracy must be tested by titration as follows. The procedure used is the same whether the acid or borate is being tested; however, it is essential that the other solution is known to be accurate. It is also essential that the hydrogen peroxide solution is exactly pH 4.5.
- Fill the acid and borate burettes, allow to reach room temperature and zero.
- Take a clean dry 150-ml conical flask or beaker and pour in about 30 ml (this volume is not critical) of 1 vol hydrogen peroxide, neutralised to pH 4.5 as described above.
- Add exactly 10 ml of 0.002 M sulphuric acid from the burette. Add 3 to 5 drops of BDH pH 4.5 indicator to give a definite, but not deep, pink colour.
- Take an identical conical flask, and pour in 50 ml of peroxide. This is the ‘colour control’. Mark the flask neck ‘cc’. Add 3 to 5 drops of indicator as above; the colour control should be neutral grey.
- Titrate the sample with 0.002 M di-sodium tetraborate to the "neutral grey" end-point. Record the volume to the nearest 0.01 ml. The amount used should be between 9.60 and 9.90 ml (not 10 ml, as might be expected, because of the pH selected as the end-point).
Three test titrations should be done and the mean taken. A mean result less than 9.60 indicates that the borate is too strong (or the acid, if this is being tested, is too weak). A mean result greater than 9.90 indicates that the borate is too weak (or the acid is too strong).
6.7 PREPARATION OF A NEW COLOUR CONTROL
A correct colour control must always be used when titrating with BDH 4.5 indicator. When making up fresh pH 4.5 peroxide solution, it is normal to use a small quantity of the previous batch. However, if this is your first batch, or the old batch is not neutral grey to the indicator, a correct colour control can be made up as follows.
Five clean, dry conical flasks, eg. 150 ml size, are needed. It is important that these flasks are identical in shape, size, and glass colour. At least 500 ml of 1 volume hydrogen peroxide solution, nominally pH 4.5 will be needed. If none is available, it can be made up as in Section 6.2 above but without the colour control. This volume is not critical, and some will be used for rinsing flasks. Both 0.002 M sulphuric acid and 0.002 M di-sodium tetraborate solutions are needed, in their usual clean burettes. Only small quantities will actually be used.
The method is as follows:
- Measure the same volume of nominally pH 4.5 hydrogen peroxide into each flask: 40 ml is adequate, but use 50ml if preferred.
- Add 3 drops of indicator to each flask, and swirl to mix well.
- Check carefully that all five solutions are identical in colour at this stage. If not, the glassware may be contaminated: discard, rinse thoroughly with pH 4.5 peroxide and try again.
- Identify the flasks as A, B, C, D, and E. Proceed as follows:
- to A, add just 2 drops of 0.002 M sulphuric acid
- to B, add just 1 drop of 0.002 M sulphuric acid
- leave C alone
- to D, add just 1 drop of 0.002 M di-sodium tetraborate
- to E, add just 2 drops of 0.002 M di-sodium tetraborate
- and swirl each flask to mix.
Each of the five solutions now differs from its neighbours by one drop of acid or borate.
- Against a white background, compare the colours of the solutions. They should vary very slightly, showing the range of colours seen around the titration end point.
- Compare the colours of the solutions. A will obviously be different to E, and so on. It is assumed here that the colour of C is close to neutral grey. If C is very wrong, the following tests may need to be modified, and in the extreme case a "3 drop A" or "E" solution may need to be prepared.
- Compare the colour of C critically with its neighbours. You may decide that C appears slightly "cold" or blue-grey (alkaline) while B is neutral. Alternatively you may decide that C is slightly "warm" or straw-pink (acid) while D is neutral. However, and this is most likely to be the case, you may decide that none of your solutions is truly neutral grey, and the true end-point falls somewhere between an adjacent pair of colours.
- Whatever the outcome, select the 3 solutions whose colours "bracket" neutral-grey most closely, and discard the other two. Your choice should be one of:
- A B C and discard D E, or
- B C D and discard A E, or
- C D E and discard A B.
Make a note of your choice.
Now prove that your choice is correct by the "half drop" test below.
Preparing a half-drop solution:
- Rinse the 2 discarded flasks well with nominally pH 4.5 neutralised peroxide and drain well.
- Measure 80 ml of peroxide (or 100 ml if the original quantity was 50 ml) and add 6 drops of indicator into one flask.
- If your choice of colours was A B C or B C D, add one drop of acid.
- If your choice of colours was C D E, add one drop of borate.
- Mix thoroughly, by pouring the full flask into the empty one and back several times, being careful not to spill any.
- Finally, split the solution carefully into two equal parts, one in each flask. Use the measuring cylinder for this - it must be accurate.
- Each of these two flasks now contains half a drop of acid or borate. Identify them as X and Y. Now select whichever one of the following options applies:
- If you chose A B C above, add just one drop of acid to X only, and swirl to mix. Colourwise, X (1.5 drops of acid) fits between A and B, while Y (0.5 drop acid) fits between B and C.
- If you chose B C D above, add just one drop of borate to Y only, and swirl to mix. Colourwise, X (0.5 drop acid) fits between B and C, while Y (0.5 drop borate) fits between C and D.
- If you chose C D E above, add just one drop of borate to Y only, and swirl to mix. Colourwise, X (0.5 drop borate) fits between C and D, while Y (1.5 drops borate) fits between D and E.
- Repeat the neutral-grey comparison, as above, and select the one solution which now seems to be accurately neutral-grey against its neighbours. Discard the rest.
- Now prepare a fresh batch of pH 4.5 1 volume hydrogen peroxide to this same colour standard. Do this within 20 minutes, as the colour control will deteriorate quickly on contact with air.
Please note that the samples of peroxide used for testing must now be discarded: do not return them to the bulk storage bottle. Never add indicator to the bulk stock solution.
Always keep enough of your previous batch of peroxide to use as a colour control for the next batch. This will help maintain a consistent standard. However, you should repeat above procedure from time to time (eg. every few months) to maintain accuracy.
If you have difficulty in identifying the neutral-grey end-point, your indicator may be faulty, your nominally neutral peroxide is not neutral or is more than 1 vol strength, or your acid and/or borate solutions are the wrong strength.
6.8 CALCULATION OF SULPHUR DIOXIDE CONCENTRATIONS
The concentration of sulphur dioxide is calculated using the volume of air sampled and the volume in ml of 0.002 M di-sodium tetraborate required for the titration. The equation for this calculation is as follows:
where C SO2 is the concentration of sulphur dioxide ( µg m-3)
T is the amount of di-sodium tetraborate added in the titration (ml), and
V is the volume of air ( for historical reasons this is in ft3: to convert from metric, 1 m3 =35.314667 ft3 ) .
This calculation can be incorporated into a computer program or spreadsheet. Alternatively, as in the case of smoke measurements, "look-up" tables are supplied by AEA Technology Environment (Appendix 3). These give the SO2 concentration for known values of V and T, and both ft3 and metric versions are available.
6.9 PREPARATION OF NEW STORAGE CONTAINERS
New storage containers for the 1 vol pH 4.5 dilute peroxide solution need to be prepared before use. This section describes the procedures.
6.9.1 Glass
Although "hard" (borosilicate) glass is specified for use with dilute hydrogen peroxide solution, alkali is commonly given up by the glass when new, and this will interfere with the measurement of sulphur dioxide. It is therefore necessary to eliminate this alkali before using the glassware.
Any new bottle or container should be washed with deionised water, rinsed with 1 vol pH 4.5 hydrogen peroxide solution and then completely filled with the peroxide and sealed with the stopper (or screw cap) provided. Leave for at least a day, then place about 50 ml of this solution in a beaker, then add BDH 4.5 indicator, and compare with a fresh 50 ml sample of the hydrogen peroxide placed in a similar beaker to which indicator has also been added.
If the colours of the two samples are identical, the container is suitable for use. If the colours differ, the procedure should be repeated until there is no colour change.
In the case of a glass storage bottle for 1 vol hydrogen peroxide which is to be used for the first time, a strong solution of hydrochloric acid (25% v/v HCl in deionised water) can be used to remove any alkali present. This should be obtained ready mixed and handled with caution, wearing gloves and goggles. After the storage bottle has been completely filled with the acid by means of a large funnel and allowed to stand for 24 hours, the acid can either be disposed of in accordance with safety procedures, or returned to its own labelled storage bottle and stored for another occasion. The storage bottle for hydrogen peroxide should then be rinsed several times with tap water and then filled with deionised water, which is left in the bottle for a further 24 hours. After this and a further rinse with deionised water the bottle is ready for use. If it is intended to have a preliminary trial period of one month of more when the results will not be required for the permanent records, there is no need to carry out this conditioning with strong acid as the storage bottle will be automatically conditioned after a period of 3 or 4 weeks.
If Drechsel bottles, or other glass vessels used for storage, have to be left unused for any length of time, they should be completely filled with 1 vol hydrogen peroxide at pH 4.5 and stored in the dark. If a glass vessel is allowed to stand dry for any length of time the effects of the above conditioning may wear off.
6.9.2 Plastic Containers
Plastic containers may be used for transporting exposed reagent but certain precautions must be observed. Before use the containers should be tested with neutral 1 vol hydrogen peroxide as described above for Drechsel bottles, and only those which remain neutral should be used. Plastic containers do not respond to the conditioning process described in the previous section, and that different containers of the same type may differ markedly in their effect on the dilute hydrogen peroxide solution.
6.10 DETERIORATION OF THE INDICATOR
BDH pH 4.5 indicator contains several compounds, one of which is broken down by contact with the air. It should be kept in a sealed bottle in a cool, dark place, ideally a refrigerator. It is supplied in quantities of 500 ml; smaller quantities can be transferred to a small dropper bottle. The solution of the indicator is normally stable for many months, but indicator which is left to dry out around the top of the bottle will decompose. The bottle and its dropper should be kept free from any residue by wiping with a tissue. As a safeguard, indicator should always be added first to the control sample, and if this gives the correct colour, it can then be added to the exposed sample. The control sample is easily replaced if the indicator has decomposed.
Decomposed indicator takes on a more brown colour; it will change from amber through brown to green, rather than from pink through grey to blue. There is no longer a clear-cut colour change at the pH 4.5 end-point. If this occurs, fresh indicator should be obtained. If a pH meter is available, and an amber colour is obtained in the exposed sample on the addition of indicator, the meter can be used to determine the end-point; the presence of the indicator does not affect the result.
Figure 6.1 Laboratory Apparatus for Preparation and Titration of Solutions
Figure 6.2 Burette Scale with Examples of Readings
Site prepared by the National Environmental Technology Centre, part of AEA Technology, on behalf of the UK Department of the Environment, Transport and the Regions